Qt 布局係統提供在 Widget 中自動排列子級小部件的簡單、強大方式,以確保它們很好地使用可用空間。
Qt includes a set of layout management classes that are used to describe how widgets are laid out in an application's user interface. These layouts automatically position and resize widgets when the amount of space available for them changes, ensuring that they are consistently arranged and that the user interface as a whole remains usable.
所有 QWidget subclasses can use layouts to manage their children. The QWidget::setLayout () function applies a layout to a widget. When a layout is set on a widget in this way, it takes charge of the following tasks:
Qt's layout classes were designed for hand-written C++ code, allowing measurements to be specified in pixels for simplicity, so they are easy to understand and use. The code generated for forms created using Qt Designer also uses the layout classes. Qt Designer is useful to use when experimenting with the design of a form since it avoids the compile, link and run cycle usually involved in user interface development.
| QBoxLayout | 水平或垂直排列子級 Widget |
| QButtonGroup | 用於組織按鈕 Widget 組的容器 |
| QFormLayout | 管理輸入 Widget 錶單及其關聯標簽 |
| QGraphicsAnchor | 錶示 QGraphicsAnchorLayout 中 2 項之間的錨點 |
| QGraphicsAnchorLayout | 可以在圖形視圖中將 Widget 錨定在一起的布局 |
| QGridLayout | 在柵格中布置 Widget |
| QGroupBox | 帶標題的分組框框架 |
| QHBoxLayout | 水平排列 Widget |
| QLayout | 幾何管理器的基類 |
| QLayoutItem | 操縱 QLayout 的抽象項 |
| QSizePolicy | 描述水平 垂直重置大小策略的布局屬性 |
| QSpacerItem | 布局中的空白空間 |
| QStackedLayout | 每次僅一 Widget 可見的 Widget 堆棧 |
| QStackedWidget | 每次僅一 Widget 可見的 Widget 堆棧 |
| QVBoxLayout | 垂直排列 Widget |
| QWidgetItem | 錶示 Widget 的布局項 |
The easiest way to give your widgets a good layout is to use the built-in layout managers: QHBoxLayout , QVBoxLayout , QGridLayout ,和 QFormLayout . These classes inherit from QLayout ,依次派生自 QObject (not QWidget ). They take care of geometry management for a set of widgets. To create more complex layouts, you can nest layout managers inside each other.

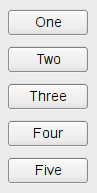
以下代碼創建 QHBoxLayout that manages the geometry of five QPushButtons , as shown on the first screenshot above:
    QWidget *window = new QWidget;
    QPushButton *button1 = new QPushButton("One");
    QPushButton *button2 = new QPushButton("Two");
    QPushButton *button3 = new QPushButton("Three");
    QPushButton *button4 = new QPushButton("Four");
    QPushButton *button5 = new QPushButton("Five");
    QHBoxLayout *layout = new QHBoxLayout(window);
    layout->addWidget(button1);
    layout->addWidget(button2);
    layout->addWidget(button3);
    layout->addWidget(button4);
    layout->addWidget(button5);
    window->show();
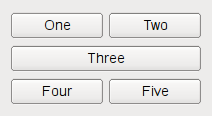
The code for QVBoxLayout is identical, except the line where the layout is created. The code for QGridLayout is a bit different, because we need to specify the row and column position of the child widget:
    QWidget *window = new QWidget;
    QPushButton *button1 = new QPushButton("One");
    QPushButton *button2 = new QPushButton("Two");
    QPushButton *button3 = new QPushButton("Three");
    QPushButton *button4 = new QPushButton("Four");
    QPushButton *button5 = new QPushButton("Five");
    QGridLayout *layout = new QGridLayout(window);
    layout->addWidget(button1, 0, 0);
    layout->addWidget(button2, 0, 1);
    layout->addWidget(button3, 1, 0, 1, 2);
    layout->addWidget(button4, 2, 0);
    layout->addWidget(button5, 2, 1);
    window->show();
第 3 QPushButton spans 2 columns. This is possible by specifying 2 as the fifth argument to QGridLayout::addWidget ().
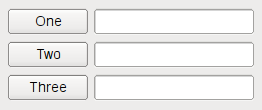
QFormLayout will add two widgets on a row, commonly a QLabel 和 QLineEdit to create forms. Adding a QLabel 和 QLineEdit on the same row will set the QLineEdit 作為 QLabel 's buddy. The following code will use the QFormLayout to place three QPushButtons and a corresponding QLineEdit on a row.
    QWidget *window = new QWidget;
    QPushButton *button1 = new QPushButton("One");
    QLineEdit *lineEdit1 = new QLineEdit();
    QPushButton *button2 = new QPushButton("Two");
    QLineEdit *lineEdit2 = new QLineEdit();
    QPushButton *button3 = new QPushButton("Three");
    QLineEdit *lineEdit3 = new QLineEdit();
    QFormLayout *layout = new QFormLayout(window);
    layout->addRow(button1, lineEdit1);
    layout->addRow(button2, lineEdit2);
    layout->addRow(button3, lineEdit3);
    window->show();
When you use a layout, you do not need to pass a parent when constructing the child widgets. The layout will automatically reparent the widgets (using QWidget::setParent ()) so that they are children of the widget on which the layout is installed.
注意: Widgets in a layout are children of the widget on which the layout is installed, not of the layout itself. Widgets can only have other widgets as parent, not layouts.
You can nest layouts using
addLayout()
on a layout; the inner layout then becomes a child of the layout it is inserted into.
When you add widgets to a layout, the layout process works as follows:
Widgets are normally created without any stretch factor set. When they are laid out in a layout the widgets are given a share of space in accordance with their QWidget::sizePolicy () or their minimum size hint whichever is the greater. Stretch factors are used to change how much space widgets are given in proportion to one another.
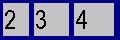
If we have three widgets laid out using a QHBoxLayout with no stretch factors set we will get a layout like this:

If we apply stretch factors to each widget, they will be laid out in proportion (but never less than their minimum size hint), e.g.
When you make your own widget class, you should also communicate its layout properties. If the widget uses one of Qt's layouts, this is already taken care of. If the widget does not have any child widgets, or uses manual layout, you can change the behavior of the widget using any or all of the following mechanisms:
調用 QWidget::updateGeometry () whenever the size hint, minimum size hint or size policy changes. This will cause a layout recalculation. Multiple consecutive calls to QWidget::updateGeometry () will only cause one layout recalculation.
If the preferred height of your widget depends on its actual width (e.g., a label with automatic word-breaking), set the height-for-width flag in the widget's size policy 並重實現 QWidget::heightForWidth ().
即使實現 QWidget::heightForWidth (), it is still a good idea to provide a reasonable sizeHint().
For further guidance when implementing these functions, see the Qt 季刊 文章 交易高度為寬度 .
The use of rich text in a label widget can introduce some problems to the layout of its parent widget. Problems occur due to the way rich text is handled by Qt's layout managers when the label is word wrapped.
In certain cases the parent layout is put into QLayout::FreeResize mode, meaning that it will not adapt the layout of its contents to fit inside small sized windows, or even prevent the user from making the window too small to be usable. This can be overcome by subclassing the problematic widgets, and implementing suitable sizeHint() and minimumSizeHint() 函數。
In some cases, it is relevant when a layout is added to a widget. When you set the widget of a QDockWidget 或 QScrollArea (with QDockWidget::setWidget () 和 QScrollArea::setWidget ()), the layout must already have been set on the widget. If not, the widget will not be visible.
If you are making a one-of-a-kind special layout, you can also make a custom widget as described above. Reimplement QWidget::resizeEvent () to calculate the required distribution of sizes and call setGeometry() on each child.
The widget will get an event of type QEvent::LayoutRequest when the layout needs to be recalculated. Reimplement QWidget::event () to handle QEvent::LayoutRequest 事件。
An alternative to manual layout is to write your own layout manager by subclassing QLayout 。 邊框布局 and 流式布局 examples show how to do this.
Here we present an example in detail. The
CardLayout
class is inspired by the Java layout manager of the same name. It lays out the items (widgets or nested layouts) on top of each other, each item offset by
QLayout::spacing
().
To write your own layout class, you must define the following:
In most cases, you will also implement minimumSize() .
card.h
)
#ifndef CARD_H
#define CARD_H
#include <QtWidgets>
#include <QList>
class CardLayout : public QLayout
{
public:
    CardLayout(QWidget *parent, int dist): QLayout(parent, 0, dist) {}
    CardLayout(QLayout *parent, int dist): QLayout(parent, dist) {}
    CardLayout(int dist): QLayout(dist) {}
    ~CardLayout();
    void addItem(QLayoutItem *item) override;
    QSize sizeHint() const override;
    QSize minimumSize() const override;
    int count() const override;
    QLayoutItem *itemAt(int) const override;
    QLayoutItem *takeAt(int) override;
    void setGeometry(const QRect &rect) override;
private:
    QList<QLayoutItem*> list;
};
#endif
card.cpp
)
//#include "card.h"
首先定義
count()
to fetch the number of items in the list.
int CardLayout::count() const
{
    // QList::size() returns the number of QLayoutItems in the list
    return list.size();
}
Then we define two functions that iterate over the layout:
itemAt()
and
takeAt()
. These functions are used internally by the layout system to handle deletion of widgets. They are also available for application programmers.
itemAt()
returns the item at the given index.
takeAt()
removes the item at the given index, and returns it. In this case we use the list index as the layout index. In other cases where we have a more complex data structure, we may have to spend more effort defining a linear order for the items.
QLayoutItem *CardLayout::itemAt(int idx) const
{
    // QList::value() performs index checking, and returns 0 if we are
    // outside the valid range
    return list.value(idx);
}
QLayoutItem *CardLayout::takeAt(int idx)
{
    // QList::take does not do index checking
    return idx >= 0 && idx < list.size() ? list.takeAt(idx) : 0;
}
addItem()
implements the default placement strategy for layout items. This function must be implemented. It is used by QLayout::add(), by the
QLayout
constructor that takes a layout as parent. If your layout has advanced placement options that require parameters, you must provide extra access functions such as the row and column spanning overloads of
QGridLayout::addItem
(),
QGridLayout::addWidget
(),和
QGridLayout::addLayout
().
void CardLayout::addItem(QLayoutItem *item)
{
    list.append(item);
}
The layout takes over responsibility of the items added. Since
QLayoutItem
does not inherit
QObject
, we must delete the items manually. In the destructor, we remove each item from the list using
takeAt()
, and then delete it.
CardLayout::~CardLayout()
{
     QLayoutItem *item;
     while ((item = takeAt(0)))
         delete item;
}
The
setGeometry()
function actually performs the layout. The rectangle supplied as an argument does not include
margin()
. If relevant, use
spacing()
as the distance between items.
void CardLayout::setGeometry(const QRect &r)
{
    QLayout::setGeometry(r);
    if (list.size() == 0)
        return;
    int w = r.width() - (list.count() - 1) * spacing();
    int h = r.height() - (list.count() - 1) * spacing();
    int i = 0;
    while (i < list.size()) {
        QLayoutItem *o = list.at(i);
        QRect geom(r.x() + i * spacing(), r.y() + i * spacing(), w, h);
        o->setGeometry(geom);
        ++i;
    }
}
sizeHint()
and
minimumSize()
are normally very similar in implementation. The sizes returned by both functions should include
spacing()
, but not
margin()
.
QSize CardLayout::sizeHint() const
{
    QSize s(0,0);
    int n = list.count();
    if (n > 0)
        s = QSize(100,70); //start with a nice default size
    int i = 0;
    while (i < n) {
        QLayoutItem *o = list.at(i);
        s = s.expandedTo(o->sizeHint());
        ++i;
    }
    return s + n*QSize(spacing(), spacing());
}
QSize CardLayout::minimumSize() const
{
    QSize s(0,0);
    int n = list.count();
    int i = 0;
    while (i < n) {
        QLayoutItem *o = list.at(i);
        s = s.expandedTo(o->minimumSize());
        ++i;
    }
    return s + n*QSize(spacing(), spacing());
}
很多 Qt Widgets examples 已使用布局,不管怎樣,存在幾個範例能陳列各種布局。
| 地址簿教程 | An introduction to GUI programming, showing how to put together a simple yet fully-functioning application. |
| 邊框布局範例 | Shows how to arrange child widgets along a border. |
| 計算器範例 | 範例展示如何使用信號/槽來實現計算器 Widget 功能,及如何使用 QGridLayout 將子級小部件放在柵格中。 |
| 日曆 Widget 範例 | 日曆 Widget 範例展示使用 QCalendarWidget。 |
| 迴顯插件範例 | 此範例展示如何創建 Qt 插件。 |
| 流式布局範例 | Shows how to arrange widgets for different window sizes. |
| 圖像閤成範例 | Shows how composition modes work in QPainter. |
| 菜單範例 | The Menus example demonstrates how menus can be used in a main window application. |
| 簡單樹模型範例 | "簡單樹模型範例" 展示如何使用,具有 Qt 標準視圖類的分層模型。 |
| Sub-Attaq | This example shows Qt's ability to combine the animation framework and the state machine framework to create a game. |