基於鬧鍾應用程序的 Qt Quick 教程。
This tutorial shows how to develop a simple alarm application as an introduction to Qt Quick and Qt Quick Controls2.
This application is similar to the alarm application usually found on an Android phone. Its features let you enter, edit, or delete alarms. An alarm can trigger on a given date, and you can set it to repeat on a series of subsequent days.
The main screen shows the list of saved alarms:
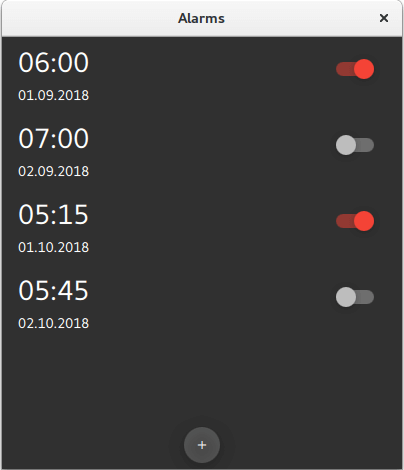
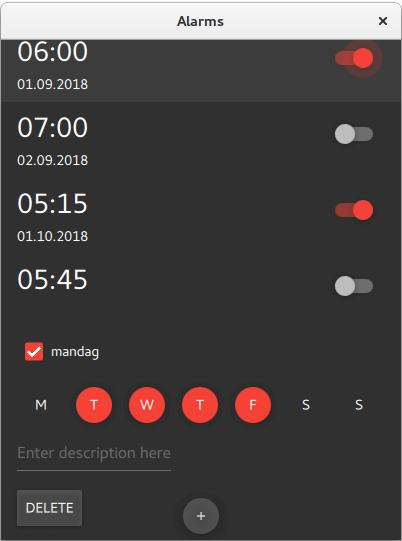
The detail screen lets you edit or delete existing alarms:
The dialog screen is used for adding new alarms. It pops up when you click on the "+" RoundButton on the bottom of the main screen:

The source files are located in the qtdoc repository. You can either fetch the Qt 5 sources from the Qt Project, or install them as part of Qt 5. The application is also available in the example list of Qt Creator's Welcome mode.
This section shows how to create the project in Qt Creator. It discusses the files generated automatically by Qt Creator, and the two files the programmer has to create in Qt Creator or some other editor. The latter two files are included with the source code for this tutorial.
Setting up a new project in Qt Creator is aided by a wizard that guides you step-by-step through the project creation process. The wizard prompts you to enter the settings needed for that particular type of project and creates the project for you.
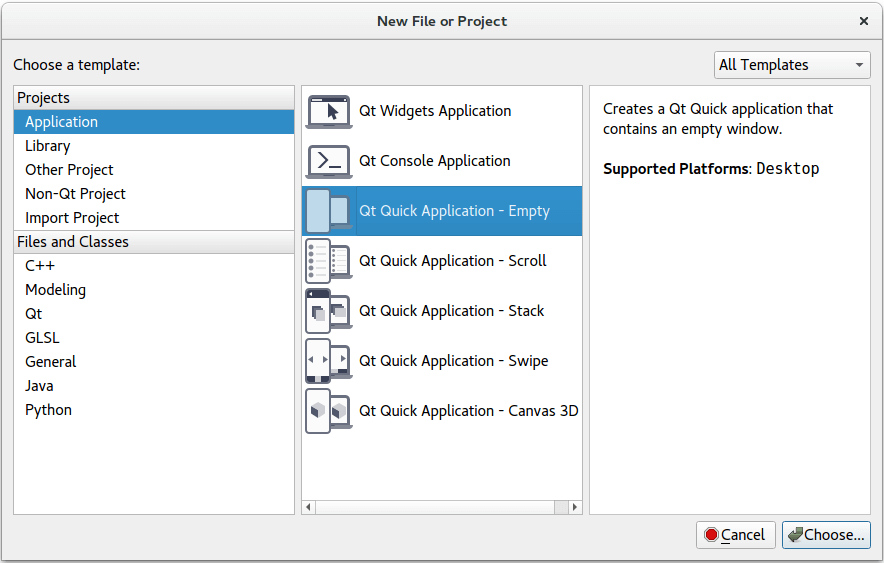
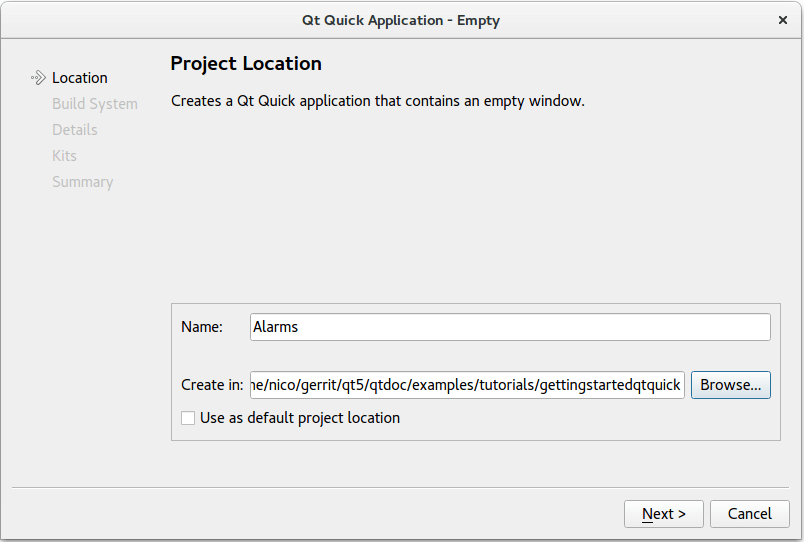
To create the Alarms project, select File > New File or Project > 應用程序 > Qt Quick Application - Empty > Choose . Type "alarms" in the 名稱 field, and follow the instructions of the wizard.
The Qt Quick application wizard creates a project that contains the following source files:
| 源文件 | 目的 |
|---|---|
| alarms.pro | 工程文件 |
| main.cpp | 應用程序的主 C++ 代碼文件。 |
| qml.qrc | ,包含源文件名稱的資源文件,除 main.cpp 和工程文件外。 |
The wizard generates the code in the main.cpp file below. This code block enables High DPI scaling and declares
app
and
engine
. The engine then loads our main QML file.
int main(int argc, char *argv[])
{
    QCoreApplication::setAttribute(Qt::AA_EnableHighDpiScaling);
    QGuiApplication app(argc, argv);
    QQmlApplicationEngine engine;
    engine.load(QUrl(QStringLiteral("qrc:/main.qml")));
    if (engine.rootObjects().isEmpty())
        return -1;
    return app.exec();
}
| 源文件 | 目的 |
|---|---|
qtquickcontrols2.conf
|
選擇
Material
樣式采用
Dark
主題。
|
main.qml
|
The QML code that links AlarmDialog.qml, AlarmModel.qml, AlarmDelegate.qml and TumblerDelegate.qml |
AlarmDialog.qml
|
定義用於添加新鬧鍾的對話框。 |
AlarmDelegate.qml
|
定義 APP 主屏幕布局。 |
AlarmModel.qml
|
定義 ListModel 用於存儲鬧鍾數據。 |
TumblerDelegate.qml
|
定義輪轉圖形布局 |
qtquickcontrols2.conf
以下片段展示如何設置
Dark
theme in the
Material
style:
[Controls]
Style=Material
[Material]
Theme=Dark
Accent=Red
main.qml
mainWindow
,
ApplicationWindow
QML type, is the root item in this app.
ApplicationWindow {
    id: window
    width: 400
    height: 500
    visible: true
The
ListView
alarmListView
combines the data from
alarmModel
with the layout defined in
alarmDelegate
.
    ListView {
        id: alarmListView
        anchors.fill: parent
        model: AlarmModel {}
        delegate: AlarmDelegate {}
    }
New alarms can be added by clicking
RoundButton
addAlarmButton
. Clicking it opens a dialog screen
alarmDialog
.
    RoundButton {
        id: addAlarmButton
        text: "+"
        anchors.bottom: alarmListView.bottom
        anchors.bottomMargin: 8
        anchors.horizontalCenter: parent.horizontalCenter
        onClicked: alarmDialog.open()
    }
    AlarmDialog {
        id: alarmDialog
        x: Math.round((parent.width - width) / 2)
        y: Math.round((parent.height - height) / 2)
        alarmModel: alarmListView.model
    }
AlarmDialog.qml
此對話框屏幕擁有 RowLayout 采用 Tumbler each for hours and minutes, and another RowLayout with a Tumbler each for day, month, and year.
    contentItem: RowLayout {
        RowLayout {
            id: rowTumbler
            Tumbler {
                id: hoursTumbler
                model: 24
                delegate: TumblerDelegate {
                    text: formatNumber(modelData)
                }
            }
            Tumbler {
                id: minutesTumbler
                model: 60
                delegate: TumblerDelegate {
                    text: formatNumber(modelData)
                }
            }
        }
        RowLayout {
            id: datePicker
            Layout.leftMargin: 20
            property alias dayTumbler: dayTumbler
            property alias monthTumbler: monthTumbler
            property alias yearTumbler: yearTumbler
            readonly property var days: [31, 29, 31, 30, 31, 30, 31, 31, 30, 31, 30, 31]
            Tumbler {
                id: dayTumbler
                function updateModel() {
                    // Populate the model with days of the month. For example: [0, ..., 30]
                    var previousIndex = dayTumbler.currentIndex
                    var array = []
                    var newDays = datePicker.days[monthTumbler.currentIndex]
                    for (var i = 1; i <= newDays; ++i)
                        array.push(i)
                    dayTumbler.model = array
                    dayTumbler.currentIndex = Math.min(newDays - 1, previousIndex)
                }
                Component.onCompleted: updateModel()
                delegate: TumblerDelegate {
                    text: formatNumber(modelData)
                }
            }
            Tumbler {
                id: monthTumbler
                onCurrentIndexChanged: dayTumbler.updateModel()
                model: 12
                delegate: TumblerDelegate {
                    text: window.locale.standaloneMonthName(modelData, Locale.ShortFormat)
                }
            }
            Tumbler {
                id: yearTumbler
                // This array is populated with the next three years. For example: [2018, 2019, 2020]
                readonly property var years: (function() {
                    var currentYear = new Date().getFullYear()
                    return [0, 1, 2].map(function(value) { return value + currentYear; })
                })()
                model: years
                delegate: TumblerDelegate {
                    text: formatNumber(modelData)
                }
            }
        }
    }
}
If you click on
OK
in the dialog, the entered data will be added to
alarmModel
:
    onAccepted: {
        alarmModel.append({
            "hour": hoursTumbler.currentIndex,
            "minute": minutesTumbler.currentIndex,
            "day": dayTumbler.currentIndex + 1,
            "month": monthTumbler.currentIndex + 1,
            "year": yearTumbler.years[yearTumbler.currentIndex],
            "activated": true,
            "label": "",
            "repeat": false,
            "daysToRepeat": [
                { "dayOfWeek": 0, "repeat": false },
                { "dayOfWeek": 1, "repeat": false },
                { "dayOfWeek": 2, "repeat": false },
                { "dayOfWeek": 3, "repeat": false },
                { "dayOfWeek": 4, "repeat": false },
                { "dayOfWeek": 5, "repeat": false },
                { "dayOfWeek": 6, "repeat": false }
            ],
        })
    }
    onRejected: alarmDialog.close()
AlarmDelegate.qml
Each alarm in the main screen is an
ItemDelegate
。
ItemDelegate
root
contains all fields on the main screen and the detail screen. The detail screen's fields are only visible after an alarm has been clicked on, i.e. when
root.checked
is
true
.
ItemDelegate {
    id: root
    width: parent.width
    checkable: true
    onClicked: ListView.view.currentIndex = index
    contentItem: ColumnLayout {
        spacing: 0
        RowLayout {
            ColumnLayout {
                id: dateColumn
                readonly property date alarmDate: new Date(
                    model.year, model.month - 1, model.day, model.hour, model.minute)
                Label {
                    id: timeLabel
                    font.pixelSize: Qt.application.font.pixelSize * 2
                    text: dateColumn.alarmDate.toLocaleTimeString(window.locale, Locale.ShortFormat)
                }
                RowLayout {
                    Label {
                        id: dateLabel
                        text: dateColumn.alarmDate.toLocaleDateString(window.locale, Locale.ShortFormat)
                    }
                    Label {
                        id: alarmAbout
                        text: "⸱ " + model.label
                        visible: model.label.length > 0 && !root.checked
                    }
                }
            }
            Item {
                Layout.fillWidth: true
            }
            Switch {
                checked: model.activated
                Layout.alignment: Qt.AlignTop
                onClicked: model.activated = checked
            }
        }
        CheckBox {
            id: alarmRepeat
            text: qsTr("Repeat")
            checked: model.repeat
            visible: root.checked
            onToggled: model.repeat = checked
        }
        Flow {
            visible: root.checked && model.repeat
            Layout.fillWidth: true
            Repeater {
                id: dayRepeater
                model: daysToRepeat
                delegate: RoundButton {
                    text: Qt.locale().dayName(model.dayOfWeek, Locale.NarrowFormat)
                    flat: true
                    checked: model.repeat
                    checkable: true
                    Material.background: checked ? Material.accent : "transparent"
                    onToggled: model.repeat = checked
                }
            }
        }
        TextField {
            id: alarmDescriptionTextField
            placeholderText: qsTr("Enter description here")
            cursorVisible: true
            visible: root.checked
            text: model.label
            onTextEdited: model.label = text
        }
        Button {
            id: deleteAlarmButton
            text: qsTr("Delete")
            width: 40
            height: 40
            visible: root.checked
            onClicked: root.ListView.view.model.remove(root.ListView.view.currentIndex, 1)
        }
    }
}
AlarmModel.qml
This QML file contains the definition of
alarmModel
,
ListModel
that manages the alarm data.
它創建 5 個 ListElements 采用範例鬧鍾。
import QtQuick 2.11
// Populate the model with some sample data.
ListModel {
    id: alarmModel
    ListElement {
        hour: 6
        minute: 0
        day: 2
        month: 8
        year: 2018
        activated: true
        label: "Wake up"
        repeat: true
        daysToRepeat: [
            ListElement { dayOfWeek: 0; repeat: false },
            ListElement { dayOfWeek: 1; repeat: false },
            ListElement { dayOfWeek: 2; repeat: false },
            ListElement { dayOfWeek: 3; repeat: false },
            ListElement { dayOfWeek: 4; repeat: false },
            ListElement { dayOfWeek: 5; repeat: false },
            ListElement { dayOfWeek: 6; repeat: false }
        ]
    }
    ListElement {
        hour: 6
        minute: 0
        day: 3
        month: 8
        year: 2018
        activated: true
        label: "Wake up"
        repeat: true
        daysToRepeat: [
            ListElement { dayOfWeek: 0; repeat: true },
            ListElement { dayOfWeek: 1; repeat: true },
            ListElement { dayOfWeek: 2; repeat: true },
            ListElement { dayOfWeek: 3; repeat: true },
            ListElement { dayOfWeek: 4; repeat: true },
            ListElement { dayOfWeek: 5; repeat: false },
            ListElement { dayOfWeek: 6; repeat: false }
        ]
    }
    ListElement {
        hour: 7
        minute: 0
        day: 3
        month: 8
        year: 2018
        activated: false
        label: "Exercise"
        repeat: true
        daysToRepeat: [
            ListElement { dayOfWeek: 0; repeat: true },
            ListElement { dayOfWeek: 1; repeat: true },
            ListElement { dayOfWeek: 2; repeat: true },
            ListElement { dayOfWeek: 3; repeat: true },
            ListElement { dayOfWeek: 4; repeat: true },
            ListElement { dayOfWeek: 5; repeat: true },
            ListElement { dayOfWeek: 6; repeat: true }
        ]
    }
    ListElement {
        hour: 5
        minute: 15
        day: 1
        month: 9
        year: 2018
        activated: true
        label: ""
        repeat: false
        daysToRepeat: [
            ListElement { dayOfWeek: 0; repeat: false },
            ListElement { dayOfWeek: 1; repeat: false },
            ListElement { dayOfWeek: 2; repeat: false },
            ListElement { dayOfWeek: 3; repeat: false },
            ListElement { dayOfWeek: 4; repeat: false },
            ListElement { dayOfWeek: 5; repeat: false },
            ListElement { dayOfWeek: 6; repeat: false }
        ]
    }
    ListElement {
        hour: 5
        minute: 45
        day: 3
        month: 9
        year: 2018
        activated: false
        label: ""
        repeat: false
        daysToRepeat: [
            ListElement { dayOfWeek: 0; repeat: false },
            ListElement { dayOfWeek: 1; repeat: false },
            ListElement { dayOfWeek: 2; repeat: false },
            ListElement { dayOfWeek: 3; repeat: false },
            ListElement { dayOfWeek: 4; repeat: false },
            ListElement { dayOfWeek: 5; repeat: false },
            ListElement { dayOfWeek: 6; repeat: false }
        ]
    }
}
TumblerDelegate defines the graphical properties of the Tumblers.
import QtQuick 2.11
import QtQuick.Controls 2.4
import QtQuick.Controls.Material 2.4
Text {
    text: modelData
    color: Tumbler.tumbler.Material.foreground
    font: Tumbler.tumbler.font
    opacity: 1.0 - Math.abs(Tumbler.displacement) / (Tumbler.tumbler.visibleItemCount / 2)
    horizontalAlignment: Text.AlignHCenter
    verticalAlignment: Text.AlignVCenter
}
At the bottom of the startup screen, you can see a Button for adding alarms. Click it to open the Add new alarm 對話框。
    RoundButton {
        id: addAlarmButton
        text: "+"
        anchors.bottom: alarmListView.bottom
        anchors.bottomMargin: 8
        anchors.horizontalCenter: parent.horizontalCenter
        onClicked: alarmDialog.open()
    }
新鬧鍾對話框:
All fields are entered using
Tumbler
QML types. If you press
OK
, the values selected in the Tumblers are written to
alarmModel
.
    contentItem: RowLayout {
        RowLayout {
            id: rowTumbler
            Tumbler {
                id: hoursTumbler
                model: 24
                delegate: TumblerDelegate {
                    text: formatNumber(modelData)
                }
            }
            Tumbler {
                id: minutesTumbler
                model: 60
                delegate: TumblerDelegate {
                    text: formatNumber(modelData)
                }
            }
        }
        RowLayout {
            id: datePicker
            Layout.leftMargin: 20
            property alias dayTumbler: dayTumbler
            property alias monthTumbler: monthTumbler
            property alias yearTumbler: yearTumbler
            readonly property var days: [31, 29, 31, 30, 31, 30, 31, 31, 30, 31, 30, 31]
            Tumbler {
                id: dayTumbler
                function updateModel() {
                    // Populate the model with days of the month. For example: [0, ..., 30]
                    var previousIndex = dayTumbler.currentIndex
                    var array = []
                    var newDays = datePicker.days[monthTumbler.currentIndex]
                    for (var i = 1; i <= newDays; ++i)
                        array.push(i)
                    dayTumbler.model = array
                    dayTumbler.currentIndex = Math.min(newDays - 1, previousIndex)
                }
                Component.onCompleted: updateModel()
                delegate: TumblerDelegate {
                    text: formatNumber(modelData)
                }
            }
            Tumbler {
                id: monthTumbler
                onCurrentIndexChanged: dayTumbler.updateModel()
                model: 12
                delegate: TumblerDelegate {
                    text: window.locale.standaloneMonthName(modelData, Locale.ShortFormat)
                }
            }
            Tumbler {
                id: yearTumbler
                // This array is populated with the next three years. For example: [2018, 2019, 2020]
                readonly property var years: (function() {
                    var currentYear = new Date().getFullYear()
                    return [0, 1, 2].map(function(value) { return value + currentYear; })
                })()
                model: years
                delegate: TumblerDelegate {
                    text: formatNumber(modelData)
                }
            }
        }
    }
}
If you click on a particular alarm, you can edit it in the detail screen.
Clicking on an alarm sets
root.checked
to
true
, which makes visible the fields of the detail screen.
visible: root.checked
If you want the alarm to trigger also on other days, check
alarmRepeat
. The Repeater will display a checkable
RoundButton
for each day of the week.
        Flow {
            visible: root.checked && model.repeat
            Layout.fillWidth: true
            Repeater {
                id: dayRepeater
                model: daysToRepeat
                delegate: RoundButton {
                    text: Qt.locale().dayName(model.dayOfWeek, Locale.NarrowFormat)
                    flat: true
                    checked: model.repeat
                    checkable: true
                    Material.background: checked ? Material.accent : "transparent"
                    onToggled: model.repeat = checked
                }
            }
        }
If you modify the description of the alarm, it will be reflected in the main screen afterwards.
        TextField {
            id: alarmDescriptionTextField
            placeholderText: qsTr("Enter description here")
            cursorVisible: true
            visible: root.checked
            text: model.label
            onTextEdited: model.label = text
        }
The detail screen (see above) has a Button for deleting alarms. When
onClicked
is emitted, the current
ListElement
is deleted from
alarmModel
.
        Button {
            id: deleteAlarmButton
            text: qsTr("Delete")
            width: 40
            height: 40
            visible: root.checked
            onClicked: root.ListView.view.model.remove(root.ListView.view.currentIndex, 1)
        }
    }
}
The app has no code for adding sound or vibration to the alarm, nor does it store the alarms in any format or database. Maybe it could be an interesting coding project to add those features. Adding sound to this program can be realized with Qt Multimedia QML 類型 . Storing the data could be done quickly and easily in JSON 格式 .
文件:
另請參閱 Qt Multimedia QML 類型 and 在 Qt 中支持 JSON .